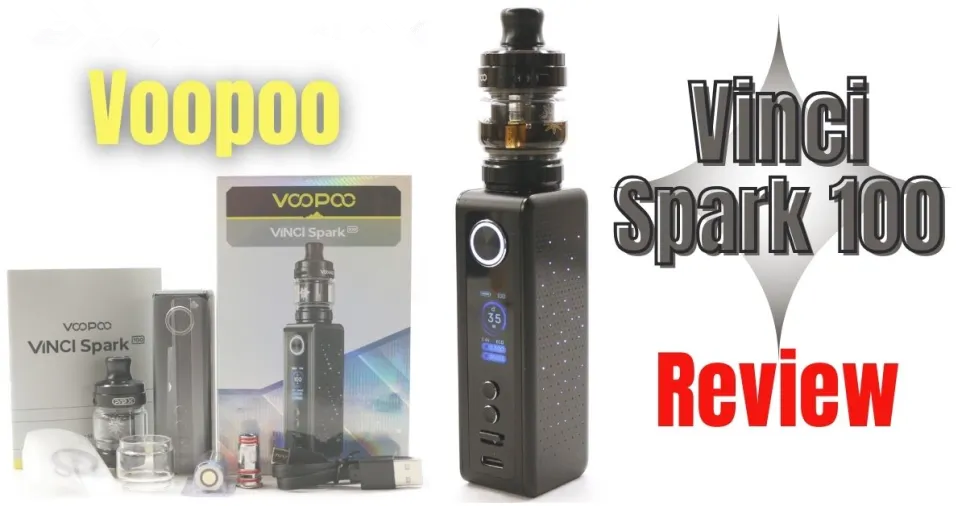

We are pleased to bring you our review on the latest addition to the Voopoo Vinci series of devices, their Vinci Spark 100 kit that’s coupled with the new UForce-X Nano tank which uses the excellent PnP-X coils.

UForce-X Nano Tank Vs UForce-X Tank
Having used several different PnP-X coils during our earlier reviews with the Drag S2/X2, Argus E40 and Drag 5, all of which we still use daily, we know only too well how great these coils perform. If the new UForce-X Nano tank is anything like its bigger brother, the UForce-X tank that comes with the Drag 5 kit, then we are in for one hell of a ride.
In the ever changing world of endless pod kits and disposables, it’s always great to see a manufacturer coming out with a new Mod and Tank setup. Of course disposables have their place and pods have come on leaps and bounds in recent years BUT you just can’t beat a good mod that’s paired with a good tank.
As always we will give a quick overview covering the main points and features of the Voopoo Vinci Spark 100 kit and then jump into the main body of the review covering everything there is to know about it.
Overview of the Vinci Spark 100 Kit


The Vinci Spark 100 is an external single 18650 battery mod with a maximum output power of 100W. Its operating modes include Smart (auto coil detect), RBA (variable wattage) and an Eco mode. There’s also an animated graphics display similar to that we’ve seeing on Voopoo’s Vmate i2 and Argus G2 pod mods, including the Drag 5 mod all of which we’ve recently reviewed.


In addition to all this, the Vinci Spark 100 has an illuminated fire button surround and removable side panel which incorporates a matrix of 144 tiny LED’s that illuminate and sparkle in different patterns under different operating conditions. Don’t panic…… the different light effects are configurable and can be switched off in the menu options screen.

A 2A Type-C USB fast charging port is located on the front panel below the + and – control buttons and separate lock/unlock switch. Above these control buttons is the 0.96 inch TFT display screen and above that the circular fire button.

The single battery compartment door for the 18650 battery, in the same design and matrix pattern to the light panel is positioned on the other side of the Vinci Spark 100 body. Both these removable panels are full height and width and magnetically attached with fingernail cut-outs at the bottom of the mod for removal.

Surprisingly (pleasantly surprised) the sculptured finish and modern designs that we’ve been used to over the last few years are not present on the Vinci Spark 100. Measuring 90mm high by 28mm wide and 33mm deep (mod only), it resembles the box (cube) style of mod devices from 8 years ago.

Included in the Vinci Spark 100 kit is the new UForce-X Nano tank having an e-liquid capacity of 4.5ml (standard) or 2ml (TPD). It’s a quarter turn top fill cap with a removable wide(ish) 510 bore drip tip and fully adjustable dual slot top located airflow control ring. It accepts the complete range of Voopoo’s PnP-X push fit coils and comes supplied with both the PnP-X 0 3 ohm and 0.6 ohm coils.

This is a slightly smaller version (little brother) of the really good larger UForce-X tank that came with the Drag 5 kit. 3 different color options (Black, Silver and Gunmetal) of the UForce-X Nano tank compliment the 6 different colors (Orange-Red Gradient, Rose Red, Silver, Black, Blue, and Metal Grey) of the Vinci Spark 100.
Voopoo Vinci Spark 100 & UForce-X Nano Tank Kit Review
Features and Specifications
Vinci Spark 100 Mod

Dimensions: 28mm (W) x 33mm (D) x 90mm (H)
Weight: 91.5 grams (136 grams with battery)
Construction: Aluminium Alloy
Charging: Type-C USB (5V/2A)
Output Wattage: 5W – 100W
Output Voltage: 3.2V – 4.2V
Resistance Range: 0.1 ohm – 3 ohm
Battery Specification: External Single 18650 (not included)
Display: 0.96 inch Multi-color TFT + Animated Graphics
144 LED Starlight Matrix Panel
Firing Mechanism: Button Fire Activated
Connection Type: Threaded 510
Output Modes: Smart, RBA and ECO
Chip Set: GENE.AI
Front Fitted Lock/Unlock Switch
6 Different Colors
7 Safety Protections
UForce-X Nano Tank
Dimensions: 28mm x 57.6mm (Standard) / 26.6mm x 55.6mm (TPD)
Weight: 56 grams (62 grams with coil)
Construction: Stainless Steel + Pyrex Glass
E-liquid Capacity: 4.5ml (Standard), 2ml (TPD)
Filling Method: Quarter turn to open Top Fill
Coil Type: All PnP-X Coil Series – 0.3 ohm and 0.6 ohm Included
Airflow: Fully Adjustable Top Dual Airflow Slots
Connection Type: Threaded 510
Drip Tip: 510 Wide Bore

The combined height of the Vinci Spark 100 and UForce-X Nano tank (standard version) is 143.5mm with the combined weight being 147.5 grams. When the single 18650 battery and the PnP-X coil is fitted the overall weight is 198 grams.
What’s in the Box?

Voopoo Vinci Spark 100 Mod
Voopoo UForce-X Nano Tank (4.5ml) *
PnP-X Mesh Coil (0.3 ohm)
PnP-X Mesh Coil (0.6 ohm)
Spare Glass – 4.5ml Bubble Glass
Spare Silicone O-Rings Pack
Type-C USB Cable
User Manual
Battery Warning Card
PnP-X Platform Card
*Note: Depending on your region, the Vinci Spark 100 kit will include a 2ml (TPD) or 4.5ml (standard) UForce-X Nano Tank.
Voopoo Vinci Spark 100 Kit Packaging

The packaging is a white cardboard slide out draw type rigid box with an outer silver sleeve that details the product content information. Once the outer sleeve is removed there is a ¾ height thin cardboard wallet that contains the user manual, a battery warning card and a PnP-X platform card.

When this wallet is removed, the Vinci Spark 100 mod, the UForce-X Nano tank with the 0.3 ohm PnP-X coil pre-fitted and a spare 4.5ml bubble glass are each held separately in place in a foam insert that’s lined with an outer cardboard surface. Above this insert is another cardboard packet that contains the Type-C charging cable, the PnP-X 0.6 ohm coil and a spares pack of different O-rings.

On the front of the outer sleeve is the company name “VOOPOO”, the brand and model type “Vinci Spark 100” and a photo sticker of the Vinci Spark 100 with the UForce-X Nano tank attached in the color of the included device.

The reverse side of the outer sleeve details the “Brand and Model type”, “Package Contents”, “Manufacturer’s Details”, “CE/Kite mark” logo’s and the relevant safety warnings.


On the left side of the outer sleeve are 4 different icons; “PnP-X Platform”, “Compact Design”, “Starlight Panel Display” and “Magnetic Battery Cover”. Below these icons is a QR code about Voopoo. The right side of the outer sleeve has the product name and brand, a “Scratch Here” authentication label and a bar code sticker with the color of the included device.

Overall size and dimensions of the packaging are 144mm high x 92.5mm wide x 38.5mm deep. As you can see from the photos we received the black Vinci Spark 100 with the matching black UForce-X Nano tank.

Preparing to Use the Voopoo Vinci Spark 100 Kit


Once you’ve unboxed your new purchase, take out the Vinci Spark 100 mod and remove the clear outer protective sleeve.

There are two removable full height and full width side panels, remove the one that’s identified as the “battery” cover from the writing on the bottom of the mod. This writing is very faint and hard to see but nevertheless it’s there.

Insert a fully charged 18650 battery (not supplied) ensuring you follow the correct battery orientation as shown in the battery compartment. For reference, the positive end of the battery goes towards the bottom of the mod. Re-attach the magnetic battery cover and turn the Vinci Spark 100 on by pressing the fire button 5 times in quick succession.


Take out the UForce-X Nano tank and unscrew the base section to gain access to the pre-installed 0.3 ohm PnP-X coil. Remove the push fit coil from the base of the tank and drip a few drops of e-liquid into each wicking port. Re-fit the coil into the bottom of the tank and re-secure the base of the tank.

Unscrew the quarter turn top cap, fill the tank with your e-liquid, re-fit the top cap and leave to stand for 10-15 minutes so the e-liquid saturates the wicking material.

Before you connect the tank, select RBA mode on the Vinci Spark 100 by pressing the fire button 3 times till “Mode” appears. Scroll down to “RBA” and select that mode by pressing the fire button. Use the “-“ button to reduce the wattage level to 5W.
Connect the UForce-X Nano tank into the 510 thread on the top of the Vinci Spark 100 and take a few draws to slowly bed your new coil in. Gradually increase the wattage, each time talking a few draws until you reach the wattage that gives you your desired draw. Don’t forget to adjust your airflow setting to suit your style of vaping.

The Vinci Spark 100 has a clear film sticker that protects the smoked black transparent full length screen and control buttons to protect during the packing process and transportation. It’s down to user preference whether you remove this or leave as it is.
For reference, we’ve written a detailed description of all of the menus and how to select and adjust them in the Functionality section of this review. We’ve also covered how to Charge and Fill your Voopoo Vinci Spark/UForce-X Nano tank.
Voopoo Vinci Spark 100 Kit Design and Appearance
Vinci Spark 100 Mod


The Vinci Spark 100 is constructed out of Aluminium Alloy and has two removable full height and width side panels; one that’s a battery door cover and the other a matrix layer of 144 tiny LED’s (more on this later). Both panels look identical and are secured magnetically to the Vinci Spark 100 body.


Overall measurements of the Vinci Spark 100 are 90mm tall (excluding the tank), 28mm wide by 33mm deep. It’s a very solid and very robust device, weighing in at 91.5 grams (136 grams with the single 18650 battery fitted).

As I mentioned earlier in the review it’s reminiscent of an old school mod having the appearance of a single solid rectangular box construction with little to no fancy curves or lines.


It’s a variable wattage mod capable of 5W – 100W with the following 3 different operating modes:
RBA: Variable wattage from 5W – 100W
SMART: Auto selects the optimum wattage and limits the maximum wattage for each coil type
ECO: Power saving mode to conserve battery power

A single external 18650 battery (not included) powers the mod with the battery fitted in a standard battery tray which is concealed behind one of the magnetic side panels. This battery cover is the left hand cover when looking at the Vinci Spark 100 face on.

Removal of the panel is via a fingernail slot at the bottom of the Spark 100 body which also has “Battery” printed by the slot so you know which panel to remove. These panels are a very secure fit so a little pressure is needed to remove.

Once the panel is removed the single battery compartment is visible and shows the correct orientation that the battery needs to be fitted (positive end downwards). A nylon strap is fixed to the inside of the battery compartment to aid removing the battery once it’s fitted.
Branding in the battery compartment is simple and includes the following:
“+” and “–“ battery orientation
“Vinci” stamped into the side case
“Spark Your Life” on the nylon battery strap

On the back of the removable battery cover has safety information printed on it and MOST importantly it states to use a high drain rated battery equal to or great than 25A.
Two large rectangular magnets positioned above and below the battery tray and on the back of the removable battery door panel do a very good job of securing this panel to the Spark 100 body. This panel can only be fitted one way round due to the shape of the inside of the battery door.


A second full height and width magnetically attached panel on the other side of the Spark 100 body, that looks identical to the battery door cover, has a matrix of 144 tiny concealed LED’s that illuminate in different patterns under different conditions.

On the front of the Vinci Spark 100 is a full height smoked black insert panel that contains the circular fire button with an illuminated surround around the button, smaller + and – control buttons, a multi-colored 0.96 inch TFT display, a rectangular lock/unlock switch and a Type-C USB charging port.

At the top of the Vinci Spark 100 is a very slightly raised circular aluminium 510 plate that’s secured to the casing with 4 star shaped screws. Within this plate is a slightly raised center threaded 510 insert with the spring loaded center pin that’s isolated with a silicone O-ring.

The base of the Spark 100 is completely flat with just two fingernail slots of the left and right edges of the casing to remove the side panels. Identification of these panels is shown by “Battery” and “Light” printed on the corresponding side which is very faint and didn’t come out in the photo, only the SAMPLE stamped on the bottom showed up.
Branding on the Spark 100 is very limited with “Voopoo” printed in very discrete lettering on the back of the casing as shown in the photo above and “Vinci” behind the battery door panel.

All of the control and functionality is carried out using a combination of the fire button and + and – control buttons with the parameters being displayed on the 0.96 inch multi-colored TFT display. The 14mm circular fire button with its illuminated surround fires the device, the smaller 5.5mm diameter + and – buttons control the wattage and access the different menus.


The rectangular lock/unlock switch just below the “-” control button disables both the fire and control buttons if required. Up (0) is unlocked, down (1) is locked. Below this switch is the Type-C charging port that’s specified as 5V/2A and can be used to charge the 18650 battery. Alternatively you can charge your battery externally in a dedicated battery charger (preferred).


All of the user information is clearly visible on the TFT display, even in pretty bright sunlight. The information on the main display includes the following:
Selected mode (RBA / Smart / Eco)
Battery level icon with % value
Numerical Wattage value
Lock / Unlock
Coil resistance reading
Puff Counter
Vape time duration
Animated interface theme (UFO or Shooting Star)

In addition to this display information, the fire button illuminates when it’s pressed and the 144 LED’s on the light panel also illuminate and sparkle in different patterns under different conditions.
The Vinci Spark 100 also has a straightforward menu structure where you can select and configure the following:

Mode: Smart, RBA or Eco
Theme: UFO or Shooting Star
Animation: On/Off
Light: On/Off
Puff Clear
Exit
Further explanation of these options and the different menu settings are detailed in the Functionality section of this review.
Control of the Vinci Spark 100 is carried out by the GENE.AI chipset and provides all the necessary protections and will display these notifications on the 0.96 inch TFT display screen:
Time Out (8 seconds)
Check Atomizer (no resistance detected)
High Temperature Protection
Low Voltage / Battery Low
Atomizer Short / Low Resistance Protection
Overcharge Protection
Output Over-Current Protection
Anti-Reverse Battery Protection
Device Function Lock / Unlock
Max Power


UForce-X Nano Tank

UForce-X Slide to Open

UForce-X Nano 1/4 Turn Lift Off4
Before we delve deeper into what the UForce-X Nano tank is all about, it’s very similar to its bigger brother the UForce-X tank that came with the Drag 5 kit. The two main differences being the UForce-X Nano is 4.5ml/2ml (not 5.5ml/2ml) and the top fill cap is no longer a slide to open but reverts back to the earlier UForce-L tank design of a quarter turn lift off top cap which we saw with the Drag M100S kit and the Argus MT/XT kit.
As the name suggests, its overall size is slightly smaller that’s its bigger brother and comes in two variants depending on your region. Unfortunately TPD user will have the 2ml version which uses a smaller straight glass and the standard version is 4.5ml with a larger bubble glass. The measurements of the two different capacity tanks are:
2ml tank = 26.6mm in diameter by 55.6mm tall
4.5ml tank = 28mm in diameter by 57.6mm tall


The UForce-X Nano tank is quarter turn top fill with top variable airflow control with a removable 510 wider bore RDL mouthpiece, a 4.5ml/2ml e-liquid capacity and accepts the PnP-X series of coils.

Made out of stainless steel, the UForce-X Nano tank feels very solid and really well made. The threads feel smooth and well machined and the quarter turn top cap has a positive lock/unlock action to it. It’s a reasonably lightweight tank weighing in at 56 grams with the 4.5ml bubble glass fitted minus the coil (62 grams with the coil fitted).

Opening the top cap is a quarter turn and lift off. Once removed, two kidney shaped fill port openings are surrounded with silicone rubber seals (membrane) enclosing the fill port openings. Filling the tank requires you to pass the e-liquid bottle tip through the membrane.


Below this top cap is the variable airflow control ring making the UForce-X Nano tank a top airflow design so there’s no leaking from the dual Cyclops slots. There are no end stops so the control ring will continually turn round and interestingly there are “0, 1, 2 and 3” printing on the solid body of the casing so you can quantify the position of the airflow ring.


On the outer side of the airflow ring is the branding “Voopoo” and “PnP-X”.

To gain access to the coil chamber, unscrew the base of the tank that incorporates the threaded 510 connector. Once the bottom 510 base section of the tank is unscrewed, you can insert the push fit PnP-X coil into the bottom of the tank.

On the inside of the 510 base, there is a gold plated spring loaded center coil positive contact pin that is isolated from the base plate with a silicone seal. Either side of this pin are two raised tags that locate with the negative coil contact plate.
Once the 510 base is removed, the 4.5ml/2ml Pyrex glass can then be gently eased off from its silicone rubber seals if cleaning is needed or you need to replace the glass. This glass fits either way round so there’s no need to worry about its orientation.


With the range of push fit PnP-X coils available, the UForce-X Nano tank is extremely versatile. Two PnP-X coils are supplied with the Vinci Spark 100 kit, a 0.3 ohm mesh rated at 32W – 40W and a 0.6 ohm mesh coil rated at 18W – 23W.

Additional PnP-X coils can be purchased and these currently include:
0.15 ohm mesh rated at 60W – 80W
0.2 ohm mesh rated at 40W – 60W
0.45 ohm mesh rated at 25W – 32W
0.8 ohm mesh rated at 12W – 16W
1.0 ohm mesh rated at 10W – 13W

On the base (underneath) of the tank are the words “UForce-X Nano Tank” printed in small white lettering together with the CE markings.

The only other markings are on the chimney section. There are 3 images of a 3 headed Wolf like figure with what looks like a fang neck collar. A bit hard to describe but you can see what I mean in the photo. This is the same emblem that’s on the larger UForce-X tank.

Color wise, the UForce-X Nano tank is available in 3 different color options; Silver, Black and Gunmetal.

The UForce-X Nano tank dismantles into 7 sections, including the coil, with 2 O-rings sealing the Pyrex glass, 1 O-ring sealing the 510 base section and 2 O-rings on the 510 drip tip. The airflow control ring also detaches so the tank and all its parts can be thoroughly cleaned.
I really like the earlier UForce-X tank that I use with the Drag 5 and have to say the UForce-X Nano is equally as impressive and ranks up there with the best of them.
Voopoo Vinci Spark 100 Functionality

The Voopoo Vinci Spark 100 is a fire button activated variable wattage mod operating from 5W – 100W that’s adjustable using the + / – control buttons. Variable airflow control on the UForce-X Nano tank allows step-less adjustment to tailor the tightness of your draw and a manual lock/unlock switch on the front panel of the Vinci Spark 100 activates/deactivates the fire and control buttons.

A 0.96 inch TFT colored display screen highlights all the user information and also includes 2 different animated graphic themes when the device is fired. A matrix of 144 bright but tiny LED’s on the side panel sparkle in 3 different sequences under varying conditions and the fire button surround also illuminates when the device is fired.


3 different operating modes are available; SMART (auto coil detect), RBA (full wattage control) and ECO (conserves battery). We’ve broken down what each of these functions do and how to select them later on in this section.
It’s worth having a read of the manual to familiarize yourself with the structure of the menus. The manual is very good as it shows and explains most of the available options. The menu structure is straight forward and easy to follow but I would recommend for the first time having a play with the different menu’s to familiarize yourself before you fit the UForce-X Nano tank.
A quick start guide of the basic functions are:
Front slide switch will lock/unlock the device
Fire button pressed 5 times turns the device on or off
Fire button pressed 3 times enters the menu settings
+ button will increase the wattage in 1W steps
– button will decrease the wattage in 1W steps
Included on the 0.96 inch TFT colored display Main screen is all of the read-out information as follows:

Shooting Star Theme

UFO Spaceship Theme
Numerical Wattage value
Selected mode (RBA / Smart / Eco)
Battery level icon with % value
Lock / Unlock
Coil resistance reading
Puff Counter
Vape time duration
Animated UFO/Shooting Star graphics when fired
Also the safety read-outs and the protection of the Vinci Spark 100 are:
Reverse Battery Protection
Overtime Protection (8s)
No Atomizer (open circuit protection)
High Temperature Protection
Low Battery (low voltage protection)
Atomizer Short (short circuit protection)
Over Charge Protection
Over Discharge Protection
Output Over-Current Protection
Max Power Protection
Lock Protection
Menu Settings

To gain access to the menu screen settings, press the fire button 3 times in quick succession. The display will switch from the main screen to a menu screen showing the following:
Mode – (additional menus)
Theme – (additional menus)
Animation – (On/Off)
Light – (On/Off)
Puff Clear – Yes/No
Exit – Returns to Main screen display
Use the + or – buttons to scroll through the available options. As you scroll through each one, the one that’s selected will be highlighted in a blue background. Press the fire button on the selected menu and it will take you to that particular menu.
Mode Menu

You can select the mode of operation you require. With the Mode screen highlighted, press the fire button and it will take you to the available options under that menu:
SMART – Selects auto coil recognition
RBA – Normal power mode
ECO – Conserves battery power
Use the + or – buttons to select the mode you want by highlighting that menu. Press the fire button and it will set that mode of operation.
Theme Menu


2 different animated themes, UFO or SHOOTING STAR can be selected which are displayed when the fire button is pressed and remain illuminated for 2 seconds before the display reverts back to the main screen.

Shooting Star Theme

UFO Spaceship Theme
The layout of the main display screen also changes depending on the theme selected as we’ve shown above.
To access these themes, press the fire button 3 times to bring up the menu screen. Scroll down to THEME and press the fire button.
Use the + or – buttons to select the two available graphic options you require and press the fire button to activate the theme that’s highlighted.
Sub Menu’s
3 additional sub menu’s are selectable; Animation On/Off, Light On/Off and Puff Clear. Each of these are actioned by highlighting the appropriate menu and pressing the fire button. We’ve shown these menu’s below:


144 LED Light Panel

The full height and width light panel will illuminate in 3 different sequences depending on the action taken:
While Vaping: Shooting star effect
Being Charged: Ascending chevron (arrow) pattern
TFT Display On: Night sky twinkling stars
These light effects can be disabled in the “Light” menu setting by switching them to OFF.
Display and LED Time-Out
Inactivity of either the fire or +/- buttons being pressed will extinguish the fire button surround LED after 6 seconds and put the display and side panel LED matrix into standby mode (blank) after 16 seconds. Note: If the “Light” function is switched OFF in the menu setting, the fire button surround light and side panel LED matrix won’t illuminate.
Lock/Unlock Switch

The lock/unlock switch positioned just below the “-“ control button will lock/unlock the fire button and +/- controls buttons. Unlike the earlier Drag 5 and Drag M100S mods where this switch was configurable to enable different functions, the lock/unlock switch on the Vinci Spark 100 locks/unlocks the whole device.


Moving the slider switch button down will put the Vinci Spark 100 into the lock position with a “1” visible on the switch. When the slider is switched to lock, the initial screen will display the red lock padlock symbol and then switch to the main display where it will show the padlock symbol underneath the wattage value in the closed position. When locked, the fire button and +/- buttons become inactive.


Overview of Modes
The user manual, while covering the available options, doesn’t quite detail what each mode setting does. To give a little insight to what these different options mean, we’ve included a brief description below:
Smart Mode

Smart mode will auto detect the type of coil fitted and set the optimum wattage for that coil. This is only a guide as you can adjust the wattage up or down using the + / – control buttons. What the Smart mode does is limit the maximum wattage you can go up to depending on the coil type you’re using.

You won’t be able to increase the wattage beyond the maximum wattage specified for the type of coil that’s in the tank. In the case of the two different supplied coils, the maximum wattage available before the display indicates “MAX POWER” is:
PnP-X 0.3 ohm = 40W
PnP-X 0.6 ohm = 23W
RBA Mode

RBA mode is basically the standard variable wattage mode and allows you to adjust the wattage for any coil type between the minimum and maximum the Vinci Spark 100 can deliver (5W – 100W).
As with all 3 modes, holding down the + or – buttons will scroll through the increments faster. There is no round robin when using the + / – buttons, once you reach the maximum wattage value the display will show “MAX POWER”. You will have to press the – button to go back down and vice versa for the minimum value.
ECO Mode

ECO mode is a selectable option and Voopoo state this as being a function to conserve battery power. I’ve struggled to understand how this mode operates as I’ve also found in the past when reviewing previous Voopoo devices that have this mode.
Putting the Vinci Spark 100 into ECO mode doesn’t reduce the power level nor does it decrease or extinguish the TFT display and light panel so I’m confused how battery power is conserved!
Observations
Despite really loving the Vinci Spark 100, I have identified a few issues with its functionality that are not as they should be. Because we received a sample kit (pre-production model), I contacted Voopoo about these problems and received a very prompt reply thanking me for raising these points. These problems have been forwarded to their design team who assure me these issues will be rectified on the general release production models.
1. Eco and Smart mode wattage value settings are not independent of each other. If you set Smart wattage to any wattage value i.e. 32W, the Eco wattage value shows the same. This also happens when setting an Eco wattage value. RBA mode can be set independently from the other two modes.
2. Wattage reverts back automatically to the optimum wattage setting for each coil type irrespective of which mode you’re in when not used for approximately 15 minutes. For example, Smart mode set to 40W and RBA mode set to 30W, 15 minutes later both modes show 65W when I was using a 0.15 ohm PnP-X coil. The same happened with the two included 0.3 ohm and 0.6 ohm coils but switched back to their optimum wattage settings of 35W and 20W respectively.
3. When the UForce-X Nano tank is unscrewed and reconnected, irrespective of whether you’re in Smart, RBA or Eco mode, the Vinci Spark 100 display automatically switches to the optimum wattage setting for that particular coil. Understandably this will happen in Smart mode but shouldn’t in RBA or Eco modes.
Voopoo Vinci Spark 100 Kit Performance

Both the PnP-X 0.3 ohm and PnP-X 0.6 ohm coils provided in the kit are DTL/RDL coils.
Even though I verified what the wattage values were in Smart mode for each coil, I always bed my coils in initially at well below the minimum recommended wattage level so not to stress the coils too quickly.
The PnP-X coils and their wicking ports are a reasonable size so are capable of working equally well with 50/50 VG/PG or 70/30 VG/PG ratio e-liquids.
PnP-X 0.6 ohm Mesh Coil – Blue Band

Voopoo specify the minimum and maximum wattage range for this coil is 18W – 23W.
When the Vinci Spark 100 is set to “Smart” mode, the wattage will be automatically set to 20W. The operating wattage of the Vinci Spark 100, when using the 0.6 ohm coil is 5W to 23W.
After priming the coil, filling the tank with 50VG/50PG Malaysian Mango e-liquid and waiting 10-15 minutes, I set the wattage to the minimum 5W to take a few draws to bed the coil in. Even at this wattage the flavor and vapor was present after a long slow draw.
Taking the wattage to 8W was another experience and a surprise as everything started to perform well. The flavor and vapor came through really nice and the draw was very smooth. Turning up the power to 10W and then 12W improved the draw intensity and I’d say I was happy with the results at 12W.
Increasing the wattage in 2W steps up to the minimum recommended for this coil of 18W improved the speed of draw and the strength of flavor and vapor at each stage. At the optimum Smart wattage of 20W gave a great vape and didn’t feel that the power was excessive.
At the maximum 23W the flavor was very strong with dense vapor and again it didn’t feel too powerful but more than I would normally vape this coil at.
My ideal wattage for this coil was back down to 14W with the airflow half open which gave a nice slow RDL draw. Airflow fully open was still very slightly restricted but equally as nice.
Although I usually vape well under the minimum recommended wattage, on this coil the optimum 20W power level was not excessive and I didn’t feel it would reduce the coil life.
PnP-X 0.3 ohm Mesh Coil – Red Band (pre-installed)

Voopoo specify the minimum and maximum wattage range for this coil is 32W – 40W.
When the Vinci Spark 100 is set to “Smart” mode, the wattage will be automatically set to 35W. The operating wattage of the Vinci Spark 100, when using the 0.3 ohm coil in Smart mode is 5W to 40W.
After priming the coil I started off at 10W and the flavor and vapor was already present and gave pretty good results. Increasing the wattage to 15W produced decent flavor with quite dense vapor.
At 20W both the flavor and vapor was really good. Incrementing the wattage in 2W steps each time still gave the same great flavor with the level of vapor increasing and only requiring a shorter draw.
Increasing it further to the minimum recommended for the coil (32W) and the Smart coil detect optimum (35W) did increase the intensity of the draw but I felt it was not needed. This level of power for me again really was too intense.
My ideal wattage for this coil was around the 15W – 18W power level with the airflow fully open.
Coil Summary

Both these coils produced terrific results. I’ve used a lot of different Voopoo PnP-X coils in other mods/pods I have and the flavor from them has always been very good, these are no exception. The amount of vapor is also impressive even below the minimum recommended.


Vaping on these coils at lower wattage’s can be done with very good results, using them on the recommended wattage was too intense for me. Below the minimum recommended for me suited my vaping style just perfect.
Airflow
Airflow, as expected from the large dual cyclops slots was very airy and gave one of the best DTL draws ever. No turbulence was detected and the vape draw was very smooth. Reducing the airflow for a Restrictive Direct to Lung draw (RDL) needed the airflow control ring to be halfway. Shutting the airflow off was too restrictive and muted the flavor and vapor.

The numerical grading printed underneath the airflow control ring is a lovely touch and makes replicating the position of the airflow ring every time very easy. I’d love to see this practice implemented on more tanks.
Voopoo Vinci Spark 100 Battery Performance

The Vinci Spark 100 mod is powered by a single 18650 external replaceable battery with the maximum wattage this mod is capable of operating up to is 100W. Vaping close to this power level from a single 18650 battery requires a battery with a CDR rating of greater than 30A.

Because the two supplied PnP-X coils are rated at 23W max for the 0.6 ohm coil and 40W max for the 0.3 ohm coil I would recommend using a battery with a CDR rating equal to or greater than 20A.
If you intended to operate the Vinci Spark 100 with the lower resistance 0.2 ohm or 0.15 ohm PnP-X coils close to their maximum wattage limit I strongly advise to use a battery with a CDR rating equal to or greater than 25A.
Throughout my time reviewing and using the Vinci Spark 100 with the supplied coils, I used my Samsung 30Q batteries (20A/3000mAh) and on average was achieving well over a day’s vaping when using the 0.3 ohm coil at 16W before I needed to fit a new battery. Swapping out the coil for the 0.6 ohm and vaping at 14W increased my vape time between charges to nearly two days.
Obviously these vape times are very subjective and depend on several factors:
Your vaping style
Type of coil you’re using
Capacity of your battery
Age and condition of your battery
Power level (wattage) you vape at
Lights on or off on the Vinci Spark 100


The Vinci Spark 100 indicates the remaining charge status of the battery at the top of the main display screen with the percentage value of charge left to the right of the battery icon. As the charge reduces the battery icon will reduce and change color with the percentage value reducing too.

Once the remaining battery charges falls below 10%, the battery icon turns red so you know you have limited time remaining before the battery cuts out. As you approach the low voltage cut-off point the TFT display will indicate “Low Power”.
When your battery runs out of charge, the display will indicate “Check Battery” and you will no longer be able to vape. At this point you will have to re-charge your battery or swap out for another fully charged battery.

The Vinci Spark 100 does have pass-thru vaping so you are able to vape while your battery is being charged in the mod. I do however recommend charging your battery in a dedicated external battery charger and replacing the battery with a fully charged one each time.
Please use our Battery Amp Draw/Drain Calculator to determine the correct value CDR value battery you should use for the wattage you plan to vape at.
Observation
Once the remaining battery charge dropped below 20% and began showing “Low Power”, the intensity of the draw on occasions reduced. Increasing the wattage level to counteract this didn’t increase the draw.
How do I Fill the Voopoo UForce-X Nano Tank?

The UForce-X Nano tank incorporates a quarter turn lift off top cap filling mechanism and is very easy to fill. Simply turn the top cap anti-clockwise until it doesn’t turn anymore and lift off the top cap.

Once the top cap is removed, there are two 7mm kidney bean shaped fill ports each with a slightly raised silicone rubber shroud around them. Either of these two fill ports can be used but do NOT fill down the center chimney hole.

The second fill port opening provides an air release so e-liquid doesn’t spill back out when you’re filling up with your e-liquid. Place your e-liquid bottle tip into one of the fill ports and fill with your favorite e-liquid to just below the top of the glass tank.

When replacing the top cap, align the small protruding tags on the underside of the top cap so it fits flush into the center hole of the tank. Turn the top cap clockwise (quarter turn) until it locks shut.
Quick Tip: If you are filling the tank for the first time, drip a few drops of e liquid onto the wicking ports of the coil first. Push the coil into the tank then fill the tank and leave to stand for approximately 10-15 minutes before you start to vape. Also keep the wattage low initially and take a few draws to pull e-liquid through the coil. Slowly increase the wattage in small steps, each time taking a few draws until you reach your desired setting. This will help saturate the wick fully in e-liquid and prolong the life of your coil.
How do I Change the Coil in the Voopoo UForce-X Nano Tank?

When the coil you’re using starts to loose flavor/vapor, shows a “Check Atomizer” / “Atomizer Short” or your e-liquid starts producing a burnt taste it’s time to replace your coil with a new one. Unscrew the UForce-X Nano tank off the Vinci Spark 100 mod.

Grasp both the top cap and glass tube then slowly unscrew the bottom 510 threaded base section anti-clockwise. Continue unscrewing until the base section comes away from the main body of the tank.

Because the Voopoo PnP-X coils are a push fit type, simply pull the old coil out from the bottom of the tank and replace with a new one.
Do note if the tank has e-liquid in it while you’re removing the coil, e-liquid will spill from the tank. The best method to avoid this or to keep e-liquid spillage to a minimum is to hold the tank upside down (drip tip pointing downwards), place your finger tightly over the opening of the drip tip and then remove the coil.

Replace with a new coil while still holding your finger over the drip tip. Turn the tank the right way up and take your finger off the drip tip. Re-secure the base section ensuring it’s securely fitted but not over tightened.

Fill the tank up with your e-liquid using the procedure outlined in How Do I Fill The UForce-X Nano Tank.
Do ensure that your new coil is primed and when filled, left to stand for 15 minutes so the e-liquid fully saturates the wick. Bed your new coil in by first vaping at a low power level and slowly increase the wattage taking a few draws each time until you reached your desired draw.
How do I Charge the Voopoo Vinci Spark 100 Mod?
As with most if not all external battery mods, there are always 2 ways which you can charge the battery. Either in the mod itself with the Type-C charging cable or removing the battery and charging in a dedicated external charger (recommended).

The Vinci Spark 100’s Type-C USB charging port is positioned just below the lock/unlock switch on the front panel. A Type-C USB charging cable comes supplied with the kit, therefore simply connect this cable into the USB port and the other end into a suitable USB power source. The specified charging circuit of the Vinci Spark 100 is 5V/2A.

Alternatively, and I would strongly recommend this, when your battery is exhausted simply remove the battery from behind the battery side panel and replace it with a fresh fully charged battery. I tend to have several spare fully charged batteries to hand so I’m never without a working vape.
At the point the battery in the Vinci Spark 100 becomes discharged, the display will indicate “Check Battery” and you will no longer be able to vape. Once this happens you will need to recharge or replace your battery.

If you’re charging the battery in the Vinci Spark 100 mod, when it’s first placed on charge the main display will very briefly illuminate then switch to a battery charging icon screen showing a segmented circle with and outer rotating ring. In the middle of the ring is a real time percentage charge value of the battery and the time remaining. Underneath this screen are animated multiple sized moving bubbles.

The fire button surround LED also illuminates together with the light panel. The LED’s on the light panel ascend in a flashing chevron (arrow) sequence.
After approximately 6 seconds the screen brightness will dim and the LED around the fire button will extinguish. A further 10 seconds later the display and the light panel will go blank. At this point there is no visual indication that the battery is being charged.
To see the charge status of your battery, you will have to press either the fire button or the +/- control buttons on the Vinci Spark 100 to bring up the display again but it will only remain visible for another 16 seconds.

Full charge is achieved when the battery indicates 100%. The Vinci Spark 100 does stop charging when full charge is reached but again there is no display indication that lets you know this unless you press a button.
Unfortunately Voopoo use this method of charging display on several of their mods as we’ve seen before. While it’s not a problem, I DO prefer to have a visual indication of the battery being charged throughout the charging cycle.
Charging time from full discharge to full charge took approximately 1 hour on my 3000mAh battery when using a standard 5V/2.1A source. I was surprised it charged this quick as I expected it to be around 1.5 hours. This time will vary depending on the current rating of the source plug and the capacity of the battery you’re using. Specifying the exact time is also hindered as the display doesn’t remain illuminated and gives no indication when full charge is reached.
The Vinci Spark 100 has pass-thru so you are able to vape while it’s being charged but this will increase the overall charge time.
As with any vape device, ALWAYS charge the mod resting on a non-flammable surface and NEVER leave your mod unattended whilst charging.
If you prefer to charge your battery externally and I really would recommend doing this, always use a reputable charger.
Voopoo Vinci Spark 100 Kit Review Verdict

Despite loving the UForce-X Nano tank, I felt the couple of issues I found on the Vinci Spark 100 sample model we received around the wattage not remaining at its set level let the overall design, ease of use and performance down.
As I mentioned earlier, Voopoo have assured me the Observations I identified in the Functionality section will not be present on the production models. For the purpose of our ranking, I’ve decided to score the Vinci Spark 100 in good faith that these issues will be fixed and are not present on the general product release.

Pros
100W power output
External 18650 battery
Very good build quality
Robust
Simple aesthetics
Removable battery and light covers
Great flavor and vapor production
Fully adjustable dual cyclops airflow
No leaking
Easy top fill
Lock/Unlock switch
Clear, crisp and bright colored display
Animated graphics
144 LED matrix light effects
Accepts all Voopoo PnP-X push fit coils
Smart coil detection
Spare Glass and O-rings
Cons
Eco mode operation seems unnecessary
Display doesn’t remain illuminated when charging
RBA and Smart mode are not independent
Wattage intermittently reverts to Smart Optimum wattage setting
Intensity of the draw diminishes as the battery drains
Voopoo Vinci Spark 100 Kit Review Summary

As expected, the UForce-X Nano tank is as great as its bigger brother and is a worthy addition to any mod. The PnP-X coils really are some of the best coils around providing great flavor and vapor.

The Vinci Spark 100 has everything going for it, 100W, external 18650 battery, TFT display with animated graphics, 144 LED twinkling star matrix panel, separate lock switch and very solid construction. If it wasn’t for the issue we had with the wattage fluctuating back to the Smart wattage setting then this would have been a great device.
Hope you enjoyed this review on the Voopoo Vinci Spark 100 and UForce-X Nano tank and found it informative and useful.